
Bleach Bypass
NOTE: This article has been updated - please read the new version here
Bleach Bypass, Skip Bleach, Bleach Reduction, ENR, ACE and Silver Tint are all basically the same process that result in a distinctive high contrast, harsh, faded look. This article looks at the ways of creating that look during processing, or with a da Vinci hardware color corrector, with Photoshop or with a Digital Vision Film Master software color system.
The traditional film process leaves a black and white image superimposed over the color image. The technique has been around for a long time, and is continually in vogue. Good feature film examples include Seven, Evita, 1984 and Saving Private Ryan, but of course there are numerous other examples that imitate the effect.
Traditional Film Lab

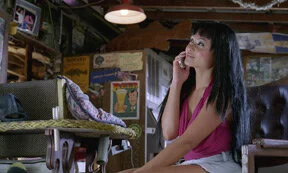
Bleach Bypass Print
Reducing or skipping the bleach bath during color film processing, leaves some or all the silver image and couples less of the color dye. The retained silver increases the contrast and grain, while the reduced dye desaturates the picture. Sometimes there is also a slight alteration of color balance, usually towards cyan. Maroons and blues tend to go black.
To alter the bleach bath labs must stop normal processing to reconfigure the machines, and less silver is recovered. Consequently it is more expensive to do and there is usually an extra charge.
Each lab has its own recipe for the technique. Some can only do a complete bleach bypass; others can offer 50% reduction by skipping the bleach accelerator. Technicolor Rome is credited with introducing the concept and offers its own ENR process, which adds a separate black and white development. This is more controlled, but not reversible.
Bleach reduction can be applied during any color processing including original camera negative (OCN), intermediate positive (IP), intermediate negative or release print. Skip bleach on negatives result in thin, blown out highlights, whereas skip bleach prints have deeper, heavier shadows and even less saturation than OCN version. The results are always hard to predict, and so it is more common to apply the process to intermediates or prints. However, skip bleach on a large number of release prints adds even more cost and so there is the risk of distant or provincial markets making conventional prints and altering the intended look considerably.
The extra density created by the silver image can add as much as 1-2 stops of exposure and so it is usual to underexpose and use flat lighting to produce good results. Another way to control the contrast is to flash the film before processing. Many cinematographers also suggest using diffusion filters or nets to compensate for the harshness. Push developing strengthens color saturation, but also increases the density. In theory a skip-bleach film can be re-processed to restore it to normality. However, if any of these compensations have been made, normal development is likely to create a thin grainy negative. Also remember that bleach bypass film is less stable in long term storage.
Variations:
The double inter-positive is a less common process that involves making a color and a black and white inter-positive and then exposing the negative to both. This offers greater control but is time consuming. The results are low saturation, but not as contrasty or as rich in the blacks as full skip bleach.
Da Vinci Color Correction (Hardware)
The bleach bypass look is very easy to create and control in post-production with a color corrector. The methods I describe here are based on a da Vinci 2K Plus, but similar techniques work on other systems too.
Da Vinci systems work by default in four-channel mode (RGB and Luminance). Increasing the contrast only in the luminance channel is very similar to the effect of retaining silver in the emulsion. So, increase luminance gamma and gain then lower the luminance blacks to compensate. Et voila! This does desaturate the image, but Master Chroma can still be used to tweak it either way.

Bleach Effect with da Vinci 2K Plus
Another way to achieve the same thing is to create a luminance only high contrast custom curve in the luminance channel. The curve needs to be S shaped, and the steeper the slope the more the contrast. This approach does not reduce the color as much, so the color needs to be reduced by creating chroma reduction curves in the RGB channels or by using Master Chroma.
There is an even more effective technique using the Defocus and Power Tier options. Grade the picture normally in the SV Primaries, and then open a Power Tier Channel over the whole image. Set the Channel Master Chroma to zero and increase the contrast. Now go to Defocus mode, enable the D2 Key bus but leave the source as none. Set the Inside path to Direct. Finally use the D2 Key bus Lift control that is in the top menu on the soft panel, to mix the normal image of the SV grade and the high contrast black and white of the Channel.
Variations:
These simple steps are really just the start of more interesting finishes. Instead of using Master Chroma to lower saturation try using very soft Chroma Light and Chroma Dark. Or, when doing the defocus blend, experiment with color washes and contrast in the intermediate channel.
Adobe Photoshop (Software)

Bleach Bypass Effect in Photoshop
Although Photoshop is designed for manipulating stills, it is useful for experimentation because many motion picture software products have similar tools. The basic technique of adding contrast and removing color will of course work, but software has the great advantage of blending modes.
Adjust the source image so that it does not have too much contrast, and then duplicate the layer. Make the new layer monochrome and high contrast. There are lots of ways to do this. The most obvious is Desaturate followed by Brightness/ Contrast. However, I prefer to use the Channel Mixer with the Monochrome box checked. Curves and Levels also make good contrast controls. Whichever method you choose, it is a good idea to make the adjustments in an adjustment layer so that the settings can be tweaked at any time. Now choose Multiply, Overlay, Hard Light or Soft Light as the layer-blending mode. I often start with Soft Light, with the Layer Opacity set to 75%, but every image is different. Sometimes a global adjustment layer is needed to brighten the image.
Background Source Image

Intermediate Layer
Variations:
Play with the various blending modes, and try different things in the monochrome layer. Using a Gaussian blur or Add Noise filter creates good results. Another approach is to use Layer Masks instead of, or as well as a Blending mode.
Digital Vision Film Master (Software)
Now we can apply both da Vinci and Photoshop techniques to moving images using Film Master software, but again similar results can be achieved on other software color enhancement systems.
Of course, the one layer does all approach is still possible. The contrast can be increased using a choice or combination of the three primary tools, Balance, Color Curves and Brightness Regions. Together they give greater control over the shadows and highlights and they allow the colorist to be very selective in placing tonal values. I liken this precision to the Ansel Adams zone system. Film Master layers also have S-Gamma that adds a simple, more filmic contrast by compressing, but not clipping, the lowlights and highlights. These tools are all RGB based, so the saturation needs to be reduced using one of the saturation controls. Naturally there is a choice there too! Hue Curves can remove input saturation, while the HSL group has separate global, lowlight and highlight saturation levels.
However, since software has unlimited correction layers I always start with a normal best light grade in the first layer and like to add effects such as Bleach Reduction in a separate layer. The layer can be absolute as described in the previous paragraph, or it can be dependent on the best light layer, also referred to as the Base. The advantage of making it a dependent layer is that the effect can remain constant across all the scenes, just as it would in chemical processing. It is easier to manage the project if the matching is done in the Base layer and is kept separate from the effect layer. Indeed the effect layer can be saved separately for use in other projects.
The technique for making a Bleach Bypass dependent layer is very similar to the monochrome layer described in the Photoshop description. The monochrome image is merged with the Base layer using opacity, blending modes and sometimes a key. Indeed the final look might use a combination of these three and then further refined with isolation windows.
Dependent layers are used like filters, although they are of course fully flexible. The low saturation and high contrast of bleach bypass is now limited only by imagination.
The monochrome layer can include a monochrome wash using Tints for example, or a duotone wash. Duotones are easily achieved in Film Master by desaturating with Hue Curves and then using Balance, Color Curves or Brightness Regions to add two or more color washes.
Luminance Coefficients are the equivalent of the Photoshop Channel Mixer. The red channel produces lighter skin tones and dark skies, while the blue channel often accentuates existing film grain.
Aperture enhancement can be added to enhance sharpness, or use Blur for the opposite effect.
Once the basic look is created, a colorist can refine the look with additional layers. Popular finishing touches are glowing highlights, and solid black layers. Both of these are easily achieved with blurred luminance mattes.
Precision and flexibility are the prime reasons for replicating this effect in post-production instead of using the chemical process. However, restoring parts of the image to a normal look can produce striking results that would be impossible to match in the film laboratory. The normal region could be the inside of a soft vignette, but a more interesting approach is achieved by using a matte. For example a blue sky or a warm skin tone could be retained while all other parts of he image have the high contrast, low saturation of the bleach reduction effect.
It is important to use any of these techniques with care. Bleach Bypass is a photographic cliché and is often used as a copycat look. However, like all other common photographic styles, it has its own symbolism and cultural meanings. Like black and white it is an abstraction of reality. The reduced color makes the images colder and less personal, especially when skin tones are involved. Feature films have defined the look further by associating it with war and documentary genres, so it is well suited to subjects that wish to portray a cold calculated reality. The abstraction can also emphasize shape and form to create beautiful, timeless compositions. These qualities are also true of monochrome images, but the infusion of natural color adds a hint of warmth lacking in those techniques. Bleach reduction relates to monochrome just as watercolor relates to charcoal. The colorist can reduce the coldness by using warmer tints, or restoring warm colors, such as skin tones. The heavy contrast, that infers oppression and darkness can also be countered by lightening mid tones and blowing out highlights. These alterations are ways to use the look intelligently, so that it adds meaning to the images. If the metaphors of style conflict with the message of the content then the illusion is lost.
That’s it. Probably more than you’ll ever need to know about Bleach Bypass and all the other terms that describe this look. There are plenty of plug-ins that create the look too, but doing it yourself is so much more fun.
Click to see the Bleach Bypass Tutorial for DaVinci Resolve and learn 5 ways to bleach.
Happy Coloring!